Saturday 19 November 2011

The F365 Photography Thread Beginners Buyers Guide

Post originally by losbandidos

Entry DSLRs:

Canon and Nikon are recommended as they are the most popular brands and therefore have best second hand market. All of the cameras below are available in Kit form – they come with the 18-55mm lens. This lens is great for beginners and allows you to shoot landscapes and portraits. Some cameras are also available with a 55-200mm lens which is good for both portraits and wildlife/sports.

New - Canon 550D, Canon 600D, Nikon D3100, Nikon D5100

New Canon DSLRs

New Nikon DSLRs

Older DSLRs - Canon 400D, 450D, 500D, Nikon D3000, Nikon D5000

The older DSLRs are not available new, but are available second hand. Although not as good as the newer models, they are great to learn the basics on.

Lenses:

Nifty Fifties: 50mm lenses are great for portraits and for getting shallow depth of field shots (images with the main subject in focus and the rest of the image blurry)

Canon

Nikon

Also Nikon make a great 35mm lens for a very good price:

Nikon 35mm

Zooms: Longer focal lengths good for wildlife/sports.

Canon 55-200

Canon 70-300

Nikon 55-200

Nikon 70-300

Wide Angle: The kit lens is very capable to take very good landscapes, but this is better.

Sigma 10-20

Canon and Nikon both make their own wide angle lenses, but these are a lot more expensive and not really in the beginners price range.

Note Regarding Focal Length

All entry level DSLRs have a crop sensor. This basically means that the actually focal of a lens is not that specified on the lens. The focal length on a lens is in terms of a Full Frame sensor (Canon 5D, Nikon D700).

What this breaks down to is that a lens has crop factor, x1.5 for Canon and x1.6 for Nikon. Therefore a 50mm in crop terms is 75mm for Canon and 80mm for Nikon.

The above is a simple explanation and better explanations are available online.

Flash Equipment:
Great flash lighting guide
Also ask in the thread about the Zack Arias One Light training DVD.

Flash: Yongnuo 460 II

Triggers: Yougnuo RF602 .These let you fire the flash remotely.

The links above are to the Yongnuo Ebay shop, you may be able to find these cheaper from other Ebay sellers.

Beginners Light Modifier: Westcott Umbrella Kit
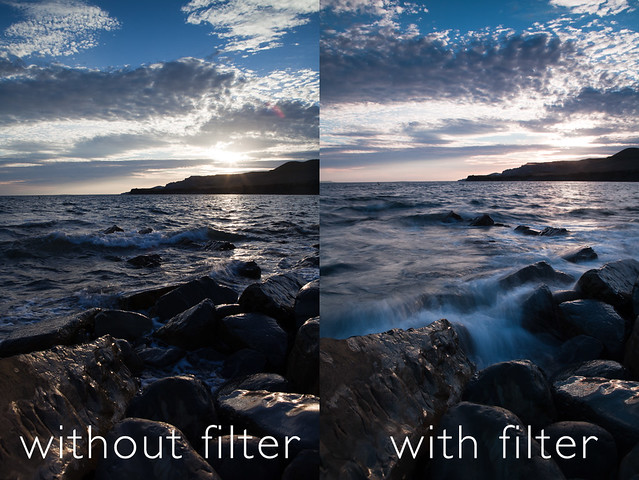
Filters:
Rodney’s guide to Filters

Filter Holder

58mm Adapter Ring

3 Stop Solid ND

3 Stop Hard Grad

The above are links so you know what to buy. You may be able to find these items cheaper elsewhere.

Note Regarding Filters

The kit lens for both Canon and Nikon have a filter thread of 58mm. When buying an adapter ring remember to get one that is the correct size for your lens. The filter size is normally written on the front face of the lens.

The standard size for filters is “P”, this takes filters that are 85mm in size. It should be possible to mix and match different brands of filter products.

Wednesday 13 April 2011

I talk about filters... yet again. With examples.

Right.
The only filters you need to buy (in my opinion) are neutral density and polarising filters. Everything else you can do in photoshop. ND and polarisers you can try and simulate, but you will never get it right. If you're on about seriously long daylight exposures then there's no way you can replicate that without the real thing.

So - starting with polarising filters.
These remove 'polarised light' - they make skies bluer and cut out reflections in water and car bodywork etc.
That's about it really, but there's nothing else that can do the same job.

Example photo with a polarising filter
Image
Chesterton Side 1 by Nick Tsiatinis, on Flickr

Neutral Density Filters
These come in two main types - the solid ND and the grad (for graduated or gradient). With ND grads you have two other types, hard and soft. I'll come to that in a bit.

So - solid ND filters - what are they? Well, it's basically something that you put in front of your lens which lengthens the exposure. A 0.3ND/ND2/1 stop will halve the amount of light getting to your sensor so you need to double the length of the exposure, a 0.6ND/ND4/2 stop will halve that again and a 0.9/ND8/3 stop will halve that again.

Why would you want this? Well, if you want to introduce a bit of motion into your photographs this is what you're after. Want the 'misty water' look? Solid NDs. Bit of motion in clouds? Solid NDs.

See the below image. The bit on the left was with no filter. Note the static look of the water. Then a 3 stop filter was added - the exposure was lengthened and we get the result on the right - motion in the water :)

Image
filterdemo by Nick Tsiatinis, on Flickr

You then have the extreme of the 10 stop filter. This lengthens your exposure by 10 stops, so an exposure which is usually metered at 1/100th would require a length of 10 seconds with a 10 stop filter. This flattens moving water, gives you really long exposure time in bright daylight and is by far my favourite filter.

Example!

Image
Serenity by Nick Tsiatinis, on Flickr

Now, ND grads...
These are the same as a solid ND, except that half the filter is coated with the neutral density bit, then the other half is clear. If the grad is hard then there's a really quick transition between the ND bit and the clear bit, but if it's soft then there's a really gradual transition. I personally believe soft ND grads are not worth it, because only the top part of the filter is actually the strength you bought. Again you can get these in varying strengths, the common ones being 1, 2 and 3 stops.

Why would you use these? Look outside on a normal day. You'll note the sky is usually much brighter than the ground. Your eyes can cope with these variances in brightness - your camera sensor cannot. Using a ND grad darkens a certain part of your photograph (the sky) bringing it within the cameras 'dynamic range' and allowing the whole scene to be recorded correctly without the sky 'blowing out'.
What strength do you use? Trial and error :)

Example: (10 stop filter stacked with 3 stop hard grad)

Image
Still by Nick Tsiatinis, on Flickr

Purchasing ND filters
I'll not go into the intricacies of why you should choose slot in filters rather than screw in filters (just trust me on this, or someone else can tell you), but buy yourself the slot in variety.

You can get either (for example)

Cokin 'P' or compatible (such as Kood or anything marked 'P' type) - these are cheap and cheerful, but may not be 'neutral' density and may add certain unwanted colours to your photos (Cokin are legendary for turning your photos purple)

or

Lee Filters - expensive but quality.

Either way, you'll be needing a filter holder (to hold your filters), a lens adapter (mounts the holder to your lens - you need one of these for each size filter thread you have on your lens - most Canon kit lenses are 58mm, and the pro lenses are usually 77mm, although they can all be different, so please check!) and the filter itself.

A Cokin P compatible set of a holder, 58mm adapter and some ND filters can be purchased for less than £50 from Premier Ink

Conversely, a Lee set will cost you around £60 for the holder, another £30 or so for the filter adapter and then you're looking at £60 per filter. Not cheap!

If you have any other questions then just ask, but I'm bored of typing now and I hope I've given you enough info to get going with :lol:

Thursday 17 March 2011

Lester's Awesome Wire Wool Tutorial!

To create pictures like this;Image
But in focus.

You will need the following;

1 hat (bits of recently burnt metal in your hair does not a good look make, a hat is essential)
some old clothes (its yet to happen to me but I have heard of people ending up with tiny scorch marks on their stuff)
Safety goggles (just in case)
Some wire wool
A length of chain (mine is 2 metres long ;) )
A camera with adjustable shutter speed
A tripod
A lighter or other source of ignition (some use a 9V battery, I found this too fiddly)
A torch
A little patience.
A fire extinguisher (I don't really expect anybody to pay attention to this one, but felt I should highlight the fact that you are literally playing with fire here and can never be too careful)
Optional - A metal whisk (this will be used as a cage to hold the wool. If you can think of something else to use with similar properties then I'm sure that would work too)
Optional - Remote shutter release (It is possible to do on your own, however it is easier with a helper/co-togger. If you're on your own it would be easier to do with a remote control for shutter release.)

*Parts in italic below relate to both with whisk and without whisk techniques, don't bother reading them twice*

Firstly, set your camera up on the tripod. Walk a nice distance from it and set a mark so you know where you are. If you have a helper, this next part will be much easier; if not use the remote and autofocus on the camera. Shine a torch on your self so the camera/helper can focus properly. If using a remote hold it down halfway and assume that it has caught you. Then return to the camera and set it to manual focus so that this doesn't change. If you have no helper, it would be a good idea to set the camera to 10 second self counter, then you can ready yourself before the shutter releases. Burns don't really last ages, so 4 seconds is normally long enough in terms of shutter speed. With regard to the white balance of the camera, colder gives off blue sparks, warmer white balance gives off red/orange.


With Whisk
Before starting, attach the whisk/cage to the middle of your chain. The doubling up of the chain makes it a little easier to control IMO

Tear a piece of wire wool off, the more you have the longer the burn will last, the more sparks etc.

put the wire wool inside the whisk like below
Image
Spread it out a little so its not all in one big clump. And its now ready.

Hold the chain so both ends are in the same hand, and the whisk is hanging down and do a few practice swings. Circles in front of you produce effects like above, swinging it around over your head produce ones like THIS. Figure 8's produce an absolute mess of crap, don't bother with that one. It is possible to make spirals and things like that though so have a go at a few different methods. Always best to try a practice swing first though.

If you're on your own press the shutter release now, you have 10 seconds in which to light the wire wool. So light the wool and swing like you practised.

If you're with a helper, have them press the shutter when you're ready.

When your burn has finished stamp out any small fires that have started. Be vigilant, you don't want to get done for arson. The main culprits for catching fire are dry leaves so try to stay away from them if possible.


No Whisk

Fold the chain in two, tear a strip of wire wool off and it around the chain in the middle.

Then twist it so that it won't come loose as in the picture below.
Image

Hold the chain so both ends are in the same hand, and the wool is hanging down and do a few practice swings. Circles in front of you produce effects like above, swinging it around over your head produce ones like THIS. Figure 8's produce an absolute mess of crap, don't bother with that one. It is possible to make spirals and things like that though so have a go at a few different methods. Always best to try a practice swing first though.

When it comes to lighting it, use the end that is hanging down (the longer end). It is most likely that because your source is not trapped in, the last chunk of it will fly off at the end. This is the main reason I took to using a cage.

If you're on your own press the shutter release now, you have 10 seconds in which to light the wire wool. So light the wool and swing like you practised.

If you're with a helper, have them press the shutter when you're ready.

When your burn has finished stamp out any small fires that have started. Be vigilant, you don't want to get done for arson. The main culprits for catching fire are dry leaves so try to stay away from them if possible.


NEVER LEAVE YOUR WIRE WOOL SUPPLY NEAR THE AREA YOU WILL BE STANDING FOR THE PICTURE. IT IS HIGHLY LIKELY TO CATCH ALIGHT


Safety first - Check you are not standing in a pool of petrol or oil.
Check you are not near anything hugely combustible.
Do not do this on railway lines or near sources of high electrical output - electricity jumps and you're holding a metal chain.
I have no idea how legal this activity is, so best not to do it on somebody else's property without permission, and not to do it with lots of people around.

Wednesday 12 January 2011

A successful foray into the world of sarcasm from Rodders: Flash gels

Aren't gels a bit redundant this days? Other than the obvious benefits of nailing it SOOC (straight out of cam) it's a piece of cake changing the hue/tint/colour of anything in PP, and you get an infinite choice of colours.

Nope. Look at longshanks' stuff. Say he's posing under an orange street light, and is using his flash to light him in an indulgent self portrait. If his flash is firing out 5600k light, he'll be balanced to 5600k ish, but the ambient will still be much warmer than that.

Shanks goes home to process the balls out of it in LR and add his description text. He decides his ambient is too orange so changes the colour temp in LR to cool down the orange and bring it a bit more white. Unfortunately he now finds that the flash light that was lighting him beautifully in 5600k has now given him a dose of the smurfs as that too has been affected by the global change in colour temp.

He's never going to get a front page explore like that, so next time he goes out he takes his cto (colour temp orange) gel which he puts on the front of his flash. Now when he takes his photo he is lit in orange, as is the ambient - this is awesome, because now when he gets home and tweaks it in lr and adds his caption, the change of colour temp to turn the orange ambient white is now having the desired effect of turning him white too!

This is great. He uploads his photo to flickr, gets 1,000,000 views, 3,000 sparkly awards and fp of flickr explore.

All because of flash gels

Tuesday 28 December 2010

Picture Styles for Canon DSLRS for stills and video shooting

Picture Style Tutorial - Excellent tutorial on using custom pictures styles.

How to increase the dynamic range of your Canon 7D - All Canon DSLRS tbf (this video shows you how to get custom picture styles on your DSLR)

Picture styles based on film stocks - great for stills but a bit extreme for video


What I'm currently using for video. There is a version for low contrast scenes, one for high contrast scenes, and another which apes the gamma curves of a Panavision Digital film camera.

The 'famous' Superflat and Extraflat for increased latitude when shooting video.


How to get custom picture styles to work in Video Mode

If you loaded your preset in stills mode already then you it is done, you just have to find it and just have to do this:
You have to remember when you were still mode if you loaded it in user define 1,2 or 3, let say you loaded in user define 3, then:
1. Turn the dial to video mode.
2. Push the menu button, scroll to picture style and push the enter button
3. Push the arrow up and down until you get to USER DEFINE 3
4. Push the DISP. button
5. Push up and down until the red square box is on Picture Style.
6. Push enter button.
7. Push up and down until you see your preset, and that is it.


Thanks to Soma

Monday 13 December 2010

Let's say you catch someone using your images without permission...

... it's theft, plain and simple. They owe you money. Send them something like this...

Dear Sir/Madam,

With regards to your unauthorised reproduction of my
photograph - screenshot attached for your reference . As
I
am sure you are aware, no permission was sought for the usage, nor was any
compensation for its licence agreed between you and I, therefore you are in
breach of copyright.

As such, please consider this an invoice for
your
past usage of this image, as well as any further usage of this image as
part of
any reporting of this event in the future.

The invoice
breaks down as
follows.

Past and future usage of the image on : £make up a
figure of your choosing
Fee for unauthorised usage:
£insert the same figure,
as a penalty charge
Total: £the two figures
added up
In addition I also
require the image is credited to xxxxxxx

Payment is due no later than 30
days of the date of this email, and
should be paid via cheque made payable to
xxxxxxx at xxxxxxx.
Should
payment not be made within 30 days, the
unauthorised usage fee will double
to £double the unauthorised fee, and action
will be taken in the courts to
recover this sum, for which an additional fee of
£whatever you like will be
charged.

No further correspondance will be
entered into regarding
this matter.

Sincerely
Your name

Wednesday 17 November 2010

The f365 Photography Thread n00b guide to buying your first dSLR
by
Nom Nom De Plume (Will) wrote on Fri, 12 November 2010 12:33

Welcome :)

dSLR’s cost a lot of money. You want to make sure you spend it wisely.

Firstly, you need to decide which brand you want to go with. It's a very important choice to make because not only do the brands differ in quality, but each brand has its own specific range of additional lenses & accessories, & so you’d have to trade in all your gear at once if you wanted to switch brands later on down the line. Consequently, very few photographers do switch brands – it’s costly, and it’s annoying. Just ask our leader, Rodney Trotter.

We recommend Canon & Nikon above all other brands for a couple of reasons;
a) they're the best quality, &
b) they have by far the widest range of additional lenses & accessories, which means that
c) you can easily get hold of second hand gear for them, which is obviously much cheaper than buying brand new.

The extra range of available equipment also means you have a much greater degree of flexibility when you reach the point where you want to advance your skills in a specific area of photography (such as macro, portrait, sports, landscape etc.)

Right, now you need to get yourself down to Jessops and check out the Canon and Nikon cameras in your price range. Get your hands on them and feel which buttons\menus feel intuitive to you. (Caution should be had with the very low entry level Nikons as they don't have autofocus in the camera so the lenses are more expensive. Ask the dude (or dudette) in the shop if it's not clear.

Then, having made your decision, thank the dude very much for their time & advice, & walk straight out of the shop. Go home & order your camera on the internet. While Jessops is a great place to ‘test drive’ stuff, it’s also frickin’ expensive, & could cost you hundreds of extra pounds which would be better spent on drugs, guns, and midgets.
http://www.camerapricebuster.co.uk is a useful price comparison site, although it’s worth comparing prices in google shopping as well just in case price buster isn’t 100% up to date.

Also have a look at www.dpreview.com - it provides really comprehensive reviews of most photography equipment.

Most of us went for brand new rather than second hand; if you do decide to go down the second hand route then make sure you buy from a reputable seller & make sure you get a worthwhile guarantee, although this applies to buying new as well - there are some cowboys out there.

Next, get yourself a subscription to Practical Photography magazine and work your way through the projects. That'll teach you all you need to know in order to use your initiative and do your own thing.

Bryan Peterson's 'Understanding Exposure' is the book that is usually recommended to new guys – it explains technique & science which is essential knowledge for taking good pictures.

Then there's probably the most useful tool you have at your disposal – this thread
Everyone here is really helpful, intelligent, & beautiful, so if you have questions, however stupid, then ask. Between us, we’re pretty knowledgeable about nearly all aspects & niches of photography. And don't forget this thread bible - which contains a whole range of articles on photography (theory, equipment, resources etc.) written by our resident experts who are:

macro - Will
portait/strobist (flash) - L'Cham/Rodders/The Reverend JT/Longshanks
landscape - Rodders
wedding - Rodders/The Reverend JT
spending other people's money - Rodders, Rodders & Rodders, but we're all happy to advise on this ;)